 WWW-POSIM v0.6.15
Submit your challenge program
Write your code in VS Code, upload it on the website and receive your score by email. The server runs your program and robot simulation, so you can close the website after submitting.
1. Prepare your account and VS Code
- Create an account at www-posim.vercel.app.
- Open the verification email and press its button. Sign in with that account.
- Your account needs server access. Ask your course organizer if the submission page says access is needed.
- Install VS Code. In Extensions, install Python by Microsoft.
- Create a folder called
posim-competitionin Documents. In VS Code, choose File → Open Folder and select it.
For website submissions you do not need to install ROS or Docker. Python and the simulation connection are prepared on the server. Keep passwords out of your code.
2. Create main.py
In the table, download the Commented file for your task. For your first submission, choose surface_station. Save the file as main.py and open it in VS Code. The Scored original has the same program logic. See Understand the measured challenge examples to learn how the code works.
| Task | Code | Five measured scores | Aggregate | Record |
|---|---|---|---|---|
surface_station |
Commented · Scored original | 70.03, 16.03, 6.16, 0.74, 1.18 | 15.2108 | ↗ |
surface_gates |
Commented · Scored original | 20.35, 21.27, 20.08, 15.11, 20.17 | 18.5392 | ↗ |
surface_slalom |
Commented · Scored original | 16.00, 16.00, 16.00, 16.00, 1.00 | 10.6000 | ↗ |
underwater_gate |
Commented · Scored original | 13.33, 13.33, 13.33, 13.33, 13.34 | 13.3338 | ↗ |
underwater_path |
Commented · Scored original | 15.00, 15.00, 15.00, 15.00, 10.00 | 13.2002 | ↗ |
underwater_return |
Commented · Scored original | 13.33, 10.00, 6.67, 10.00, 10.01 | 9.3347 | ↗ |
3. Upload your code
- Open Autonomous navigation challenges.
- Choose the task listed next to your downloaded example.
- Enter a public team name such as
MyTeam. - Choose your saved
main.pyfile. - Press Submit and evaluate. Wait for an accepted submission number, then follow its status in Your submissions.
For a program split across several files, upload a ZIP containing main.py and the helper Python files. Put main.py at the project root. ZIP only the source files; leave out .venv, downloaded packages and result folders. The upload limit is 1 MiB.
Each submitted version has its own number and result. Retrying the unchanged form on the same page reuses the upload request. After a connection error or page reload, check Your submissions before selecting a file again. To submit edited code as a new version, select the saved file again.
4. Wait for the server and email
You may close the page or sign out after the submission is accepted. Your computer no longer needs to stay connected.
Server capacity is limited, so evaluations wait in a queue. A submission evaluates the same task five times, with different target, wind and current conditions shared by all entrants, taking turns with other queued entrants between courses. The website uses lower graphics quality than the installed app; scores come from the measured simulation state.
Each account can submit twice per task per day. The limit resets at 00:00 Korea time (UTC+9). The page shows the remaining allowance for the selected task. A cancellation before any course is scored does not count; failures and cancellations with scored courses do count. Retrying the same accepted request does not use another submission. Local practice does not use this server allowance.
The submission page shows the queue position and completed evaluations, such as 2 / 5. Task limits of 120–300 seconds use simulation time. Slower computers take longer in real time: at 0.15× speed, a 300-second course takes about 33 minutes. Each course allows up to 60 minutes of scoring, plus bounded preparation and result saving. Five courses and queue turns can take hours. When evaluation ends, an email contains the score and a result link. Sign in to open that link. Check Spam if the email is missing; the saved website result is also available.
Server failures return the same submission to the queue automatically. Saved course results are kept; evaluation resumes with the interrupted course, without another upload or daily attempt. Retries start after 30 seconds and back off to at most 15 minutes during a continuing outage. The result page shows the next eligible retry time, latest server error and time, retry count and support email. Keep the submission number when contacting your course organizer or the displayed address. These diagnostics remain available after recovery. Python errors and invalid control commands require you to fix and submit the code again.
5. Read your result and improve
- Open Your submissions and press View result.
- Select an evaluation and use Play record and its time slider to inspect the path. Compare targets reached, distance, time and errors. Check the five-run score and status. Expand Program output to read your Python
print()messages or errors. - Press Download result to save the detailed JSON record. Open it in VS Code.
- Inspect each course's
report:completion,position_rms_m,heading_rms_radandcollision_proxies. - Change one part of your program, save it and upload a new version.
A completed five-run submission can enter the Leaderboard for its rules version. Current rankings exclude results from other rules; their saved result links remain accessible. If the scoring rules change while a submission is queued or being evaluated, it stops with an explanation in the result and email. Saved course records remain available; submit again under the current rules.
Failed or cancelled submissions retain diagnostic information. Their incomplete courses do not replace a completed submission's ranking. Use Cancel beside a queued or running submission when you want to stop it. For an unscored queued submission, Replace lets you choose new code. The original remains queued until the replacement is accepted.
If the server accepts cancellation before it saves the final score, it keeps the completed course records and leaves the submission out of the standings.
If something fails
- Upload response missing: check Your submissions before retrying. The server may have accepted the request before the connection closed.
- Email not verified: resend the verification email from the sign-in window, then use its button.
- Server access needed: contact your course organizer.
- ZIP rejected: keep
main.pyat the project root and include only Python source. Do not include.venv. - Wrong task: choose the task listed next to your downloaded example.
- Program failed: open Program output, fix the reported error in VS Code and submit a new file.
- The server could not start your program: the submission waits for an automatic retry. Check Program output and contact the displayed support address with the submission number if the error continues. A course that never started the program earns no score.
- Control command rejected: inspect Program output. Correct command formats or limits in your code. Simulator-readiness failures and lost server sessions queue an automatic retry. Command watchdog, command-age, format and limit rejections stop the submission; contact your course organizer with the submission number if needed.
- Connection ended during evaluation: a server connection failure queues an automatic retry. Check Program output for a separate program error. Completed course records remain available through Download result. An incomplete submission has no five-run score or rank.
- Waiting behind your own session: end your personal web workspace session to free your account for evaluation.
- Twelve submissions already pending: wait for one to finish or cancel one before uploading more.
- Server lease or wall-time error: completed course records remain saved. A lost evaluation session or scoring wall-time limit queues an automatic retry. Command watchdog and command-age rejections stop the submission; check command timing and contact your organizer if needed.
- No email yet: check the website result first. Email delivery retries when the mail service is unavailable.
- Evaluation service unavailable: wait for automatic retry. Completed records and the latest server error are saved. Contact the displayed support address with the submission number if the outage continues. An incomplete submission has no final score or rank.
- Simulation setup failure: the server could not prepare the evaluation world. It queues the submission for automatic retry and keeps completed course records.
- Current, wave or physics readback unavailable: the server cannot verify the simulation conditions. The interrupted course earns no score and is retried automatically. Completed course records and the specific server error remain available.
- Server control processing stalled: native control callbacks stopped for more than 0.75 seconds. Propulsion stops safely, the interrupted course earns no valid score and the same submission retries automatically. Completed course records, the server error and support contact remain available. A participant command watchdog remains a terminal controller error when server callbacks are healthy.
ZIP file names
Use consistent spelling and capitalization for file and folder names. Names such as main.py and MAIN.py cannot coexist, and a file cannot also be a folder. Avoid Windows device names such as CON.py, reserved filename characters, and folder names ending in a dot or space. Rename conflicting paths and update their imports before creating a new ZIP. Rejected uploads leave your submission allowance and any queued replacement target unchanged.
Each file or folder name must fit within 255 UTF-8 bytes. Non-ASCII characters can use several bytes each. Shorten names that exceed the limit, update their imports, and create a new ZIP.
Practice the same task in the installed app
- Follow Installation, open the app and sign in with your verified account.
- In Workspace → Practice arena, press Prepare competition arena. The app creates the common arena without downloading a map.
- In Vehicle → Autonomous navigation challenges · optional, choose a task and Evaluation condition 1–5. The app selects the matching layout seed automatically.
- Leave ROS 2 direct control selected. Go to Confirm and press Start generated world. Wait for the robot to be ready.
- Create a Python project from the launcher and open it in VS Code using Control an installed workspace. Save your controller as
main.py. - In the workspace's Vehicle panel, find the task card and press Start scoring before starting your code. Current and the score timer start together.
- Open the prepared terminal in VS Code and paste:
python main.py
Stop your code with Ctrl+C. Export the score and recorded path from the workspace. Restart the practice world before the next trial. Try each of the five conditions, improve your controller, then upload main.py or your ZIP on the website for an official result.
The practice JSON includes seed, the executed course (targets, obstacles, tolerances and current activation time), the measured trace and the score report. Keep this file to compare each trial's conditions and results.
If the app shows Start status not confirmed, the request may already have been accepted. Check the current world and workspace progress before starting again.
Only one evaluation can start in a world at a time. If another tab has already requested scoring, check the task card for its progress before starting again.
The arena, starting point, layout, wind, current and scoring rules match the corresponding website evaluation. Local scores are practice records. Actual speed and floating-point results can vary with the computer; the physics target is 1× with a 10 ms timestep.
In local practice in the normal app, Stop input on the task card ends an active run and records its interruption reason. Once scoring has ended, stopping waits for the result to finish saving and preserves the completed score. A finished record can be exported; start a new world for another trial. The Dev app provides ungraded development practice. Use the website submission/evaluation flow for official scores.
Read WAM-V LiDAR and camera data with ROS
Use this sensor exercise before writing an obstacle-avoidance controller. In the installed app, prepare the competition arena and choose WAM-V → Avoid buoys and berth (surface_slalom) → Evaluation condition 1. Under Attached sensors, select Forward camera and 2D lidar. Keep ROS 2 direct control selected and start the world. Wait for live robot data. Leave scoring stopped while inspecting sensors.
This task has four black obstacle buoys. Pass gates and return (surface_gates) uses red and green gate buoys. The two-buoy free-exploration example is another layout; choose the task above for this exercise.
Prepare a project with the app CLI
A CLI is the same app operated by typed commands. Use the block for your operating system in an ordinary terminal. The project folder must be new; ros init preserves existing files and refuses to overwrite them.
Windows — PowerShell:
$app = Join-Path $env:LOCALAPPDATA "Programs/WWW-POSIM/WWW-POSIM.exe"
$project = Join-Path ([Environment]::GetFolderPath('MyDocuments')) "wamv-sensors"
& $app ros init $project
& $app ros connect --workspace $project
& $app ros shell --workspace $project
Mac — Terminal:
app=/Applications/WWW-POSIM.app/Contents/MacOS/WWW-POSIM
project="$HOME/Documents/wamv-sensors"
"$app" ros init "$project"
"$app" ros connect --workspace "$project"
"$app" ros shell --workspace "$project"
Ubuntu — Terminal:
project="$HOME/wamv-sensors"
www-posim ros init "$project"
www-posim ros connect --workspace "$project"
www-posim ros shell --workspace "$project"
The app prepares a shared ROS relay. Windows/Linux use the controller container; Mac uses the bundled native environment. In the shell that opens, paste:
ros2 topic list -t
ros2 topic echo /vehicle/sensors/lidar_2d --once --field header
ros2 topic echo /vehicle/sensors/camera/compressed --once --field format
The generated practice world publishes /vehicle/sensors/lidar_2d and /vehicle/sensors/camera/compressed. Other worlds can use different names, including /model/wamv/scan and /model/wamv/camera/compressed. Use the listed topic with type sensor_msgs/msg/LaserScan for LiDAR and sensor_msgs/msg/CompressedImage for the camera. The second command prints the LiDAR message's time and frame; the third prints jpeg. Each --once command ends after one message. A topic in the list alone does not prove that messages are arriving. Type exit to return to your original terminal.
Save and plot the real sensor messages
Download wamv_sensors.py and save it in the project folder above. It uses rclpy, standard sensor messages, Matplotlib and Pillow in the prepared environment. It discovers the available LiDAR and compressed camera topics by message type within 10 seconds, then waits up to 60 seconds for a fresh pair. Missing sensors or data produce an error with recovery instructions.
With multiple cameras or LiDARs, add --camera-topic TOPIC or --scan-topic TOPIC after the script path to select the sensor shown by ros2 topic list -t. The script prints the selected topics and includes them in its JSON output.
The subscriptions use the relay's Reliable QoS:
qos = QoSProfile(depth=10, reliability=ReliabilityPolicy.RELIABLE,
                 durability=DurabilityPolicy.VOLATILE)
node.create_subscription(LaserScan, topics["scan"], scan_callback, qos)
node.create_subscription(CompressedImage, topics["camera"],
                         camera_callback, qos)
LaserScan.ranges contains distances in metres. For sample i, the script calculates angle_min + i * angle_increment, then x = range * cos(angle) and y = range * sin(angle). It ignores invalid and out-of-range samples, groups nearby adjacent returns and draws a circle around each small candidate group. It decodes CompressedImage.data as JPEG and puts the camera image beside the LiDAR plot.
Run the saved script from your original terminal:
Windows:
& $app ros run (Join-Path $project "wamv_sensors.py")
Mac:
"$app" ros run "$project/wamv_sensors.py"
Ubuntu:
www-posim ros run "$project/wamv_sensors.py"
Open the project's wamv-results folder. It contains wamv-lidar-camera.png, the original wamv-camera.jpg and wamv-sensor-data.json with ranges, frame names, sensor times, message counts and candidate circles. Docker's printed /workspace/wamv-results path maps to this host project folder. The script saves the figure directly, so no GUI display server is needed.
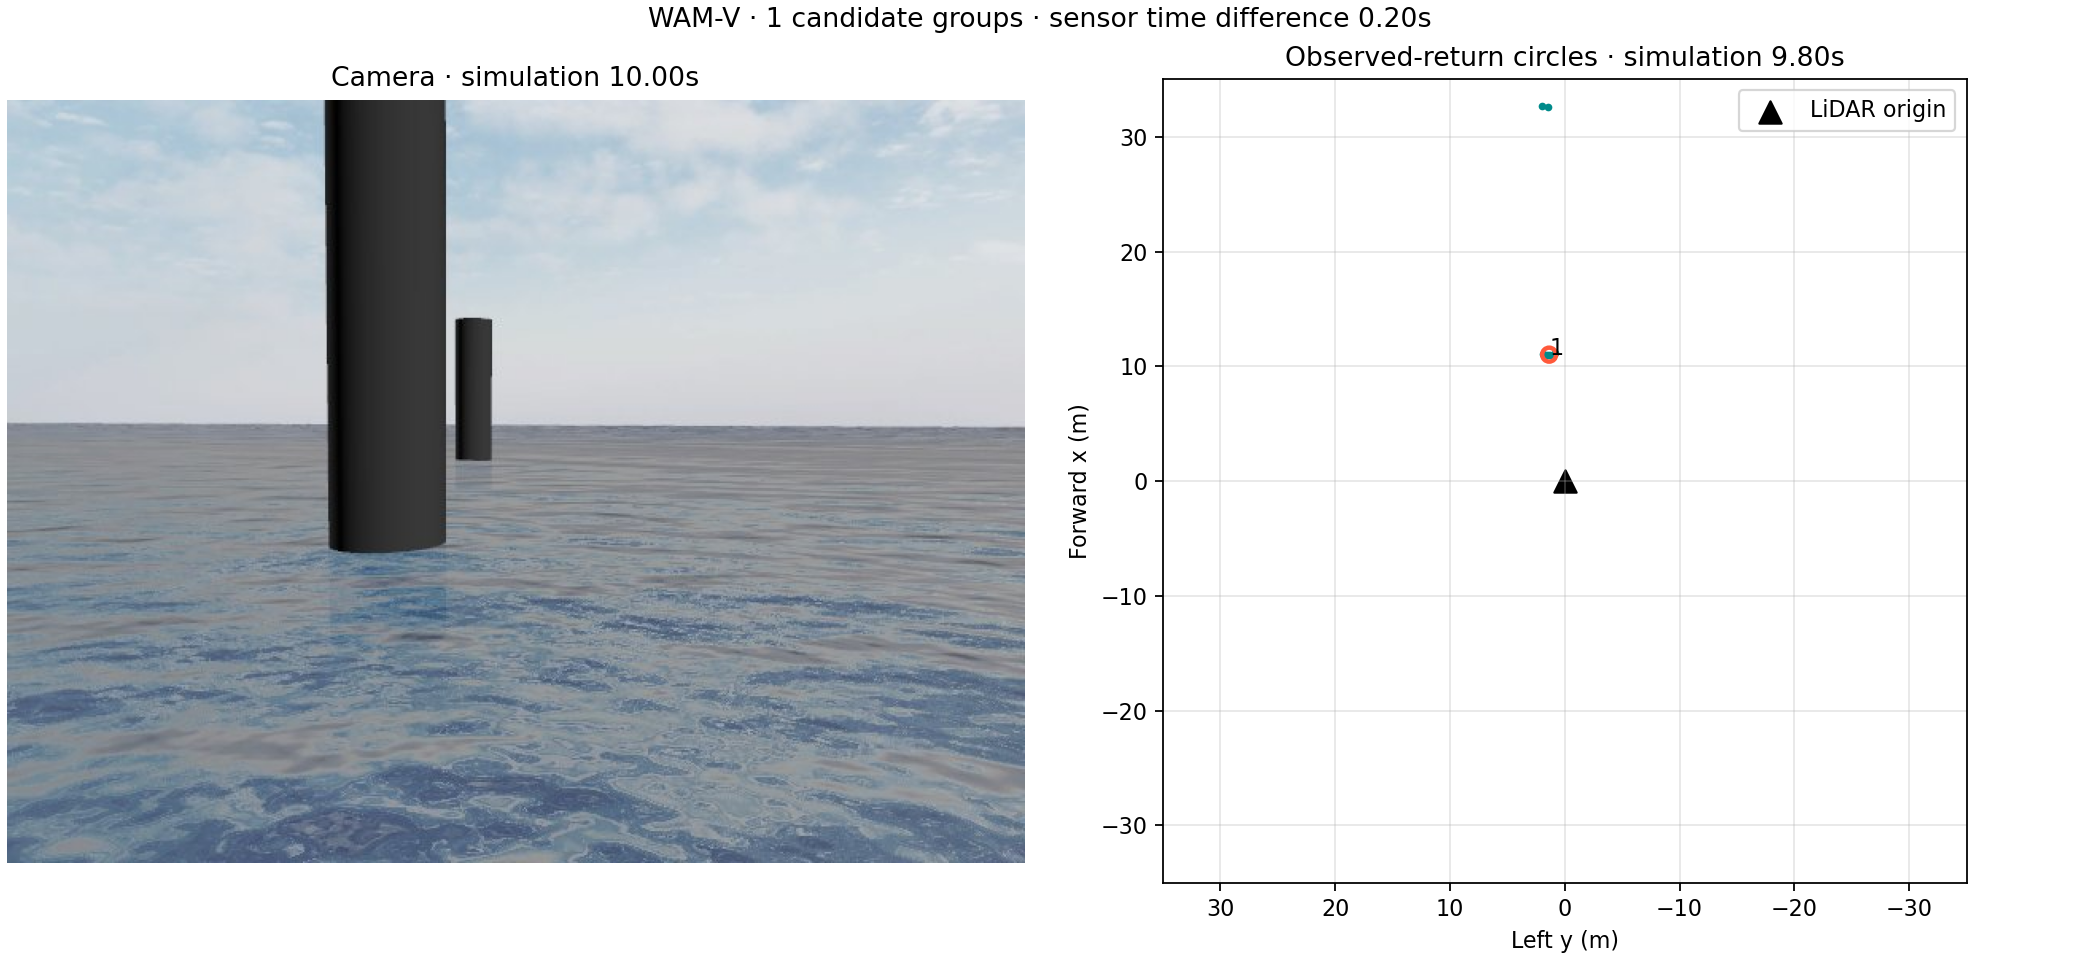
The left panel shows the received camera image. The right panel uses the LiDAR frame: forward x points up and left y points left. Sensor origins differ; these circles are not projected onto the camera image.
The plot displays valid returns across the sensor's full range. The example groups returns within 35 m, requires at least three points and keeps enclosing radii up to 2 m with 0.1 m padding. Those values are plotting heuristics, not measured buoy dimensions. Occlusion, sparse returns and sensor timing can leave obstacles undetected. The figure shows one candidate; it does not detect every buoy or run an avoidance controller. Start with Use the Python session interface, then design your own controller.
Finish the exercise
The sensor script sends no thrust commands. Stop the shared relay from your original terminal when finished:
# Windows
& $app ros stop
# Mac
"$app" ros stop
# Ubuntu
www-posim ros stop
Close the installed app to end the local world. If sensor reception fails, stop here and inspect the running world and relay log. See If something does not work before continuing.
Advanced: program interfaces and limits
Multiple files, dependencies and limits
A ZIP can contain packages and relative Python imports. Its expanded source must fit within 4 MiB and 100 files. Files use UTF-8 encoding. The server prepares the Session SDK, standard Python, NumPy, SciPy, PyYAML and ROS libraries. It does not install arbitrary dependencies from uploaded requirements files. Network access and writes to the source folder are disabled; temporary files belong under /tmp.
The code container is limited to one CPU core, 512 MiB of memory, and 64 processes and threads in total. The controller shares these resources with its local ROS relay.
Up to twelve submissions can be pending. The hourly limit is ten submissions, excluding unscored cancellations. Code storage is limited to 50 MiB per account. Challenge evaluations do not consume personal web workspace time. Ending a personal web session does not cancel an accepted code submission; use its Cancel button.
Sensor and command interfaces
sim.profile["mission"] contains the current task, targets, home and timing. sim.topics lists the assigned robot's sensor topics. sim.latest(topic) raises an error rather than silently returning old data.
The relay permits four concurrent metadata reads. Sensor and command traffic continue while those reads wait. Metadata reads do not renew the control lease; send propulsion commands within the 0.75-second watchdog window.
Run one controller at a time. The SDK waits for supported server release confirmation between bounded commands. If controller_busy appears, stop the other controller before starting yours. See BlueROV thrusters for control limits and recovery.
WAM-V accepts forward velocity within ±1.5 m/s and yaw rate within ±0.5 rad/s. Thruster commands use two WAM-V values within ±200 N or six BlueROV2 values within ±50 N. The underwater tasks need a depth controller. For ROS nodes, the runner provides WWW_POSIM_PROFILE, a temporary course JSON file, and a local ROS relay in domain 76.
The server starts scoring before it starts main.py. Printing a claimed score cannot award points. See Tasks, scores and standings for the formulas, permitted inputs and fairness limits.